
Cutting parameters
Every setting the optimiser exposes, what it actually changes, and the order worth adjusting them in. Settings are applied globally from the button in the top-right of the cutting window, and can be overridden for a single profile with the gear button on the left.
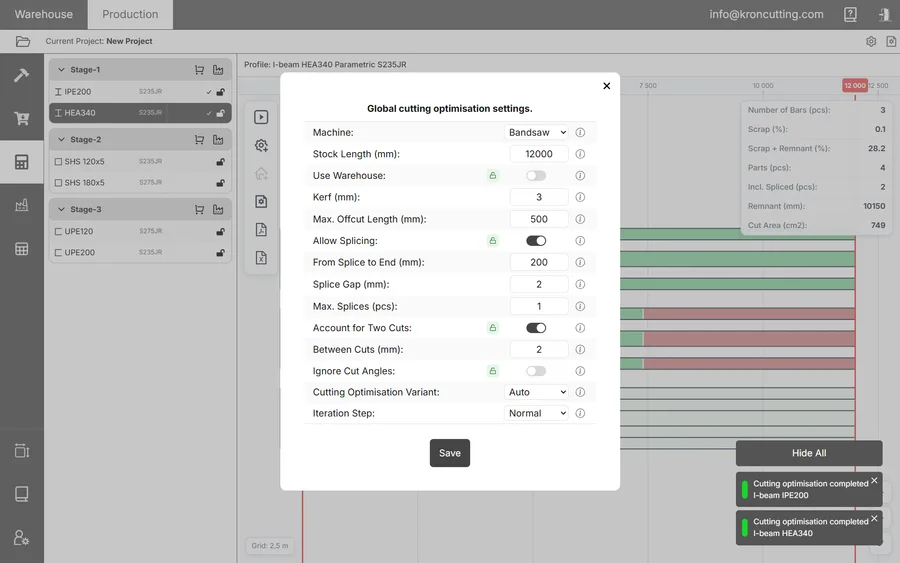
The parameters
Machine
The machine type the plan is for. This is the most consequential setting on the list: it determines the algorithm, which of the two lengths a part contributes, and what you can download afterwards.
- Bandsaw — uses the blank length, so parts with complex ends that were built up to a standard angle take more space than their natural length. Produces cutting drawings and cutting lists.
- CNC machine — uses the part length and preserves the original geometry. Produces a cutting list and a downloadable CNC result. Not available on all plans.
Stock Bar Length (mm)
The length of the bars being cut, from 1 to 24 metres. Inactive when Use Warehouse is on, because the lengths then come from the actual stock.
Use Warehouse
Whether to lay parts out on material that physically exists.
- Off — you get a preliminary plan, which is what you want when the question is how much should we buy.
- On — a selection window opens for what to use and from which warehouse. If there is not enough material, KRON performs a partial cutting. A house icon appears next to any profile using warehouse material.
Kerf (mm)
What the blade turns into swarf. KRON adds this value between parts during nesting so that the stock bar length is genuinely sufficient. Set it from your actual blade, not from the drawing.
Max. Offcut Length (mm)
The dividing line between scrap and remnant: anything longer than this is treated as a reusable remnant.
This strongly affects the plan, because the optimiser aims for minimum offcut and maximum remnant. Set it too low and you get many short pieces classed as remnant that your shop will never actually use; set it too high and usable steel is written off as scrap. Change it gradually and compare the results.
This parameter is used only inside the cutting algorithm. It does not affect what is offered as a remnant in work orders.
Allow Splicing
Whether a single part may be carried across more than one stock bar. This should be a deliberate decision — a splice costs welding time and may not be acceptable structurally.
When splicing is on, three further parameters apply:
- From Splice to End (mm) — the minimum distance from the part's edge within which no splice may fall.
- Splice Gap (mm) — the technological allowance for the splice itself.
- Max. Splices (pcs) — 1 allows the part to be divided into 2 pieces, 2 into 3, and so on. The algorithm always aims for the fewest pieces it can manage.
The parameters above control splicing globally. Where a splice may not fall on a specific part — around holes, part connections, cut-outs, the ends or the centre — is set per part when it is added. See Adding parts.
Account for Two Cuts
Adds a gap between two adjacent cuts when their angles are not equal, so that both cuts can physically be made. Between Cuts (mm) is the distance allocated for that.
Leaving this off produces a tighter-looking plan that the saw cannot actually execute.
Ignore Cut Angles
- Off — angles are accounted for and parts fit together tightly.
- On — the algorithm uses each part's maximum overall dimension instead. Waste and the number of cuts both increase.
Only turn this on when the angle data you have is not trustworthy.
Cutting Optimisation Variant
- Opt. 1 — reduces the amount of waste.
- Opt. 2 — reduces the number of splices.
- Auto — runs both and returns whichever consumed less material. Slower, since it does the work twice.
Opt. 2 exists because a splice can cost more than the extra waste that avoiding it produces. Which is true for you depends on your welding cost and your structural requirements.
Iteration Step
Coarse · Normal · Fine. Affects run time. Coarse is fastest, and the result is often no different while the time difference is substantial.
Leave it on Coarse or Normal while you are still adjusting the other parameters, and only switch to Fine once everything else is settled and you want the last fraction of a per cent.
Suggested order of work
- Set Machine, Stock Bar Length and Kerf. These describe physical reality and are not really choices.
- Decide Use Warehouse — are you planning a purchase, or cutting what you hold?
- Decide Allow Splicing, and if on, set the three splice parameters from your welding practice.
- Turn on Account for Two Cuts and set Between Cuts from your saw.
- Now start iterating on Max. Offcut Length, comparing Scrap (%) and Remnant (mm) between runs.
- Try Cutting Optimisation Variant on Auto, and see whether Opt. 2 gives an acceptable result with fewer splices.
- Only then move Iteration Step to Fine.
Per-profile overrides
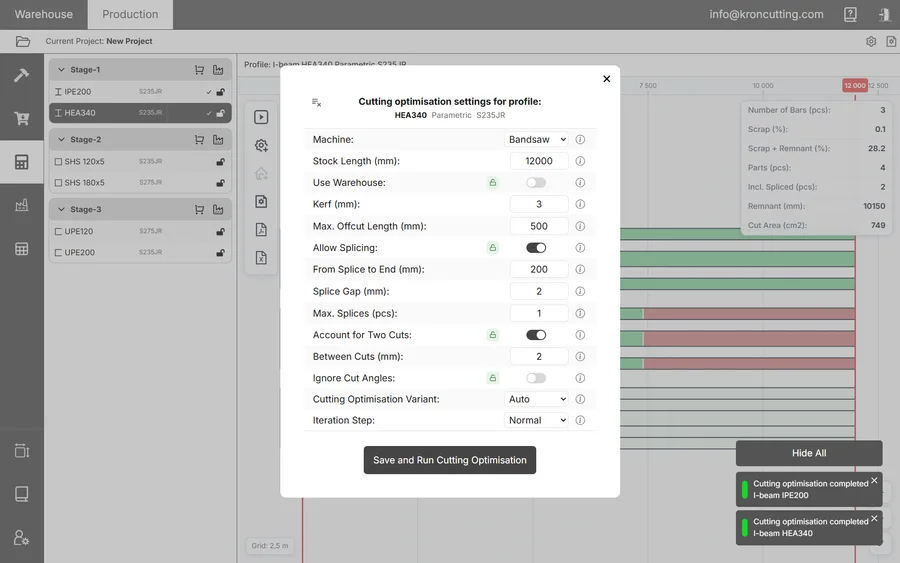
Global settings suit most profiles most of the time, but not always — a heavy section may justify a longer minimum remnant, and a profile you never splice can have splicing turned off on its own. Select the profile, click the gear on the left of the window, and change what you need. Profiles carrying their own settings show a gear icon, and the reset button at the top left returns them to the global values.