
Common mechanisms
These mechanisms behave identically in the Production and Warehouse modules. They are described here once rather than repeated in each module's chapter.
Standards
Where: the Standards Manager — the book icon at the bottom of the left-hand rail, in either module.
At the very start, select once the catalogue of standards you work with. The manager lists every available standard; tick the ones you need and save. The button at the top selects all standards of a chosen country at once.
KRON currently ships EN, Indian and South African standards catalogues.
If no standard is selected at all, KRON will prompt you to choose when the bulk-add window opens.
Send the full standard to support@kroncutting.com and it will be added to the system. In the meantime, the Custom Profiles Manager lets you create the profiles you need by hand.
If all standards are selected, the bulk-add list can take a long time to load, and where two selected standards describe profiles with identical characteristics KRON takes the first match. If you need a specific one, disable the other.
Materials and aliases
Where: the Profiles panel → the stacked-sheets icon, which opens the Materials window.
The same profile from different suppliers, or written to different standards, may carry a different material name. KRON reconciles this with aliases:
- Name — the material designation as stated in your project or in your warehouse. Internal.
- Alias — an alternative name, typically what the supplier calls it. Optional.
Your project specifies steel С345, but grade 09Г2С arrived at production. Enter С345 in the Name field and 09Г2С in the Alias field. KRON now treats them as the same material.
To add a material, enter the name — and the alias, if you need one — click Add, then Save.
Material templates
Rather than re-entering materials for every warehouse or drawing set, save them as a template. The button is in the top-left corner of the Materials window.
Give the template a name and save it. A template can be marked as the default, at which point a star appears next to its name.
The default template is applied automatically whenever a new warehouse and a new drawing set are created. Once saved, a template is available everywhere materials are used.
Adding profiles
Bulk-adding profiles
Where: the Profiles panel → the four-squares button.
The window has two columns:
- Left — every profile available under the standards you have selected.
- Right — the profiles already added to this warehouse or drawing set.
Find the profile in the left column and click it; it appears on the right. Next to it is a Select marker, indicating the profile still needs a material. Click Select, choose a material in the Materials window that opens, and save. You can add the same profile several times with different materials.
After adding, the profile appears in the Profiles panel. Note that the material is not yet physically in the warehouse — it has to be registered with a receipt document (Warehouse) or the parts added (Production).
Custom Profiles Manager
Where: the button in the bottom-left of the screen — a square with arrows in the Warehouse module, an I-beam in the Production module.
If the profile or standard you need is not in the system, choose the profile type from the drop-down and click Create. Enter the profile name, the standard and its parameters. From then on the profile appears in the left column of the bulk-add window under its type.
Cut angles
Cut angles can be edited only at the moment a part or stock bar is added — in Production that is the bulk-add Parts dialog, in the Warehouse it is the Warehouse Receipt Document form.
Once a row has a profile assigned, the buttons in its Cut Angles column become active and open the Part Parameters window.
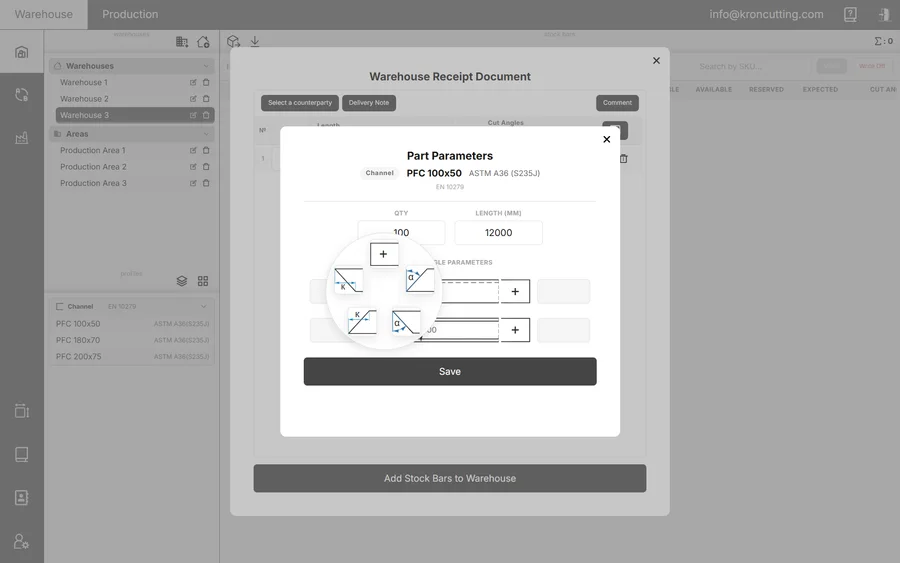
The window shows the part drawing in top and side view, with plus buttons for adding an angle to each end. Clicking a plus opens a list of angle types illustrated with diagrams and labelled by leg or by degrees — pick whichever matches the data you actually have, and enter the value.
When you enter a leg, KRON recalculates the degrees itself, using the profile height. You never have to do the trigonometry.
The four kinds of cut
The type of cut on a part end determines both how it nests and what reaches the saw:
| Type | What it is | Effect on the blank |
|---|---|---|
| Straight | A square cut. | Blank length equals part length. |
| Simple, with a specified angle | One angle, e.g. 30°, on the top or front view. The direction is shown by the symbol before the value. | Blank length equals part length. |
| Complex, with a standard angle | A shaped cut-out at the end, but one that can be built up to a simple angle (e.g. 40.16°). | The bandsaw gets a drawing with the standard angle; the original geometry is kept for CNC. Blank length is greater than part length. |
| Complex, without a standard angle | A shaped cut-out that cannot be reduced to a standard angle. | The part goes to the bandsaw with a straight cut; the original geometry is kept for CNC. Blank length equals part length. |
For parts imported from DSTV or STEP/IGS you will see both in the 2D/3D preview. Part length is the natural length of the part, and it is what participates in cutting when a CNC machine is selected. Blank length is what results from cutting on a bandsaw — KRON determines the predominant angle at the end and may build it up, which makes the blank longer.